Many Revit users are confused about Revit’s coordinate origin points. How to correctly configure them, what is the difference between them, etc. In this article it is explained how to use these points.
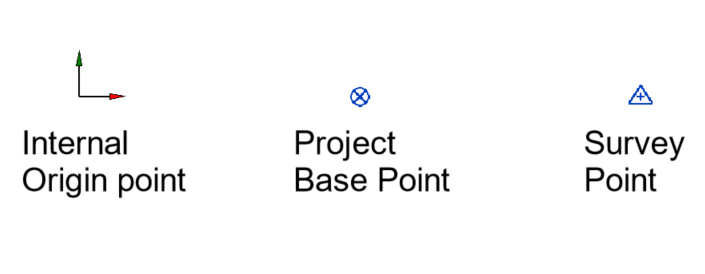
There are three coordinate origin points in Revit: Internal Origin point, Project Base Point, and Survey Point. By default, when you start a new project all these three points are in the same place – at the Internal Origin which is a fixed point that cannot be moved. This point is related to the Revit file, not your project.
Project Base Point/Survey Point. The Revit users are mostly confused about the difference between Project Base Point and Survey Point. Both of these points have the same built-in parameters: for coordinates (N/S – North/South, E/W – East/West) and elevation. Actually, these parameters are X, Y, and Z directions for the points. But for the Project Base Point these coordinates are relative to Survey Point, and for the Survey Point these coordinates are relative to the geodetic datum, a starting known point (which is usually a nearby survey mark) from which survey measurements are based. Also Project Base Point has built-in parameter Angle to True North.
Clip/Un-clip. When you select Survey Point you will notice small clip icon. The Survey Point can be in clipped or un-clipped state. It is an important option when you move it. If you move the clipped Survey Point it will keep its coordinates and you will move the site in relation to the model. And if you move the un-clipped Survey Point you will move it to another location on the site. In the older version of Revit, Project Base Point also had clip state option but since Revit 2020.2 it is always un-clipped. If you want to move Project Base Point in clipped state use “Relocate Project” tool (Manage -> Position -> Relocate Project).
Project Location. What you need to know is how these points are related to your project location and your linking strategy. If you open Manage ribbon tab, under Project Location, you will find tools that allows you to position your project through these origin points. The tools are grouped this way:
- Location. Here you you set your geographic location on the map, and define sites. This location isn’t related to origin points, and it’s important for solar studies, analyses, renders, etc. On the other side, the site is connected to your Survey Point. You can define multiple sites but only one site can be current (active).
- Coordinates. Use these tools for sharing your coordinates with multiple linked Revit models or DWG/DXF files. The “Acquire Coordinates” tool takes coordinates, elevation and True North from the linked model and applies them to the host model. Vice versa, the “Publish Coordinates” tool takes coordinates, elevation and True North from the host model and applies them to the linked model. But this tool is disabled in BIM 360 environment, so you should use the “Acquire Coordinates” tool in that case. The “Reset Shared Coordinates” tool removes shared coordinates and specified angle to True North, and moves Survey Point back to the internal origin.
- Position. Use the “Relocate Project” tool to re-position your model on the site, i.e. in relation to the Survey Point. Using the “Rotate True North” tool is identical is manually setting the “Angle to True North” parameter value.
Best practices. These are some of the best practices related to coordinate origin points:
- Use a reference model. If your project consists of several Revit models, create a reference model where you will configure coordinate origin points. Then acquire coordinates from that model to all other models of the project (Manage -> Coordinates -> Acquire Coordinates). You can also use DWG reference file from civil engineer.
- Keep Survey Point at 0. Keep Survey Point with the zero coordinates (N/S = 0, E/W = 0) and zero elevation (Elevation = 0). Use “Specify Coordinates at Point” tool (Manage -> Coordinates) to enter new coordinates and angle from Project North to True North.
- Keep Project Base Point at the Internal Origin. When you copy elements in a Revit model and paste it aligned to the other Revit model, the alignment will be in relation to the Internal Origin, not Project Base Point or Survey Point. It is important to know when you copy-paste elements between models of the same project. You can do the right-click on the Project Base Point and click “Move to Internal Origin”, if you moved the Project Base Point away from its startup location.
- Keep Project Base Point at a convenient place in your project. For example, at the intersection of the first horizontal and the first vertical grids, and at the ground level.
- Moving project and Internal Origin. You can change coordinates at any time during your project. It is not mandatory to set it at the beginning but it is a good practice. Take into account that you cannot move Internal Origin point. If you want to re-position your project in relation to the Internal Origin point, you should select and move all of your model geometry. So it’s recommended that you define where you want to be the Internal Origin before start modeling.
- Avoid decimals. If your parameter values for coordinates and angle to True North have too many decimals your models may be slightly off axis in the views that are oriented “Project North”.
- Pin points. After you finish configuring Project Base Point and Survey Point in your Revit project, pin points (Modify -> Pin) to prevent them from being moved accidentally.